5. Internal communication
This page describes how each service in dojot communicate with each other.
5.1. Components
The main components that are currently in dojot platform are Fig. 5.1.
![[Auth]
[DeviceManager]
[Persister]
[History]
[DataBroker]
[FlowBroker]
[x509-identity-mgmt]
package "Databases" {
[mongodb]
[postgreSQL]
}
package "IoT agents" {
[IoT MQTT]
[IoT LoRa]
[IoT sigfox]
[IoT RabbitMQ]
}
[postgreSQL] <-- [Auth]
[postgreSQL] <-- [DeviceManager]
[postgreSQL] <- [Kong]
[postgreSQL] <-- [x509-identity-mgmt]
[mongodb] <- [Persister]
[mongodb] <-- [FlowBroker]
[mongodb] <-- [History]
[mongodb] <-- [x509-identity-mgmt]](_images/plantuml-ad97273d0aed9ad63df2459d3939c1a0115f1303.png)
Fig. 5.1 dojot components
They are:
Auth: authentication mechanism
DeviceManager: device and template storage.
Persister: component that stores all device-generated data.
History: component that exposes all device-generated data.
DataBroker: deals with subjects and Kafka topics, as well as socket.io connections.
Flowbroker: handles flows (both CRUD and flow execution)
IoT agents: agents for different protocols.
Each service will be briefly described in this page. More information can be found in each component documentation.
5.2. Messaging and authentication
There are two methods through which dojot components can talk to each other: via HTTP REST requests and via Kafka. They are intended for different purposes, though.
HTTP requests can be sent at boot time when a component want, for instance, information about particular resources, such as list of devices or tenants. For that, they must know which component has which resource in order to retrieve them correctly. This means - and this is a very important thing that drives architectural choices in dojot - that only a single service is responsible for retrieving data models for a particular resource (note that a service might have multiple instances, though). For example, DeviceManager is responsible for storing and retrieving information model for devices and templates, FlowBroker for flow descriptions, History for historical data, and so on.
Kafka, in the other hand, allows loosely coupled communication between instances of services. This means that a producer (whoever sends a message) does not know which components will receive its message. Furthermore, any consumer doesn’t know who generated the message that it being ingested. This allows data to be transmitted based on “interests”: a consumer is interested in ingesting messages with a particular subject (more on that later) and producers will send messages to all components that are interested in it. Note that this mechanism allows multiple services to emit messages with the same “subject”, as well as multiple services ingesting messages with the same “subject” with no tricky workarounds whatsoever.
5.2.1. Sending HTTP requests
In order to send requests via HTTP, a service must create an access token, described here. There is no further considerations beyond following the API description associated to each service. This can be seen in figure Fig. 5.2. Note that all interactions depicted here are abstractions of the actual ones. Also, it should be noted that these interactions are valid only for internal components. Any external service should use Kong as entrypoint.
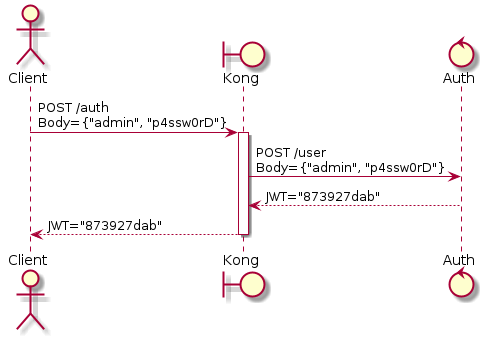
Fig. 5.2 Initial authentication
In this figure, a client retrieves an access token for user admin whose password is p4ssw0rd. After that, a user can send a request to HTTP APIs using it. This is shown in Fig. 5.3. Note: the actual authorization mechanism is detailed in Auth + API gateway (Kong).
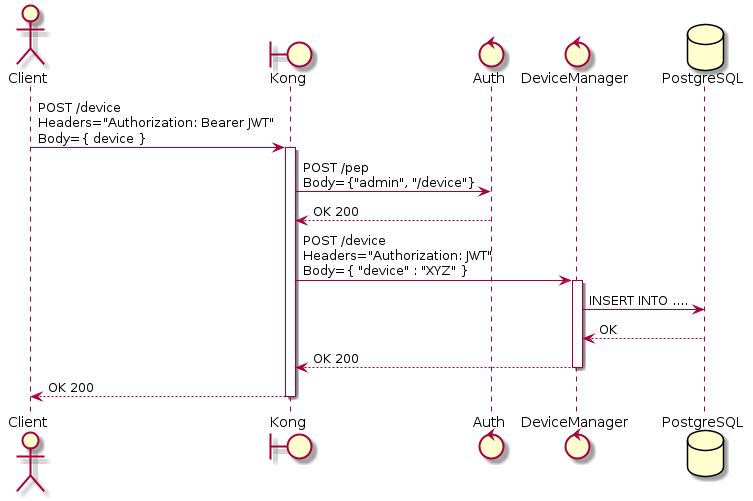
Fig. 5.3 Sending messages to HTTP API
In this figure, a client creates a new device using the token retrieved in
Fig. 5.2. This request is analyzed by Kong, which will
invoke Auth to check whether the user set in the token is allowed to POST
to /device endpoint. Only after the approval of such request, Kong will
forward it to DeviceManager.
5.2.2. Sending Kafka messages
Kafka uses a quite different approach. Each message should be associated to a subject and a tenant. This is show in Fig. 5.4;
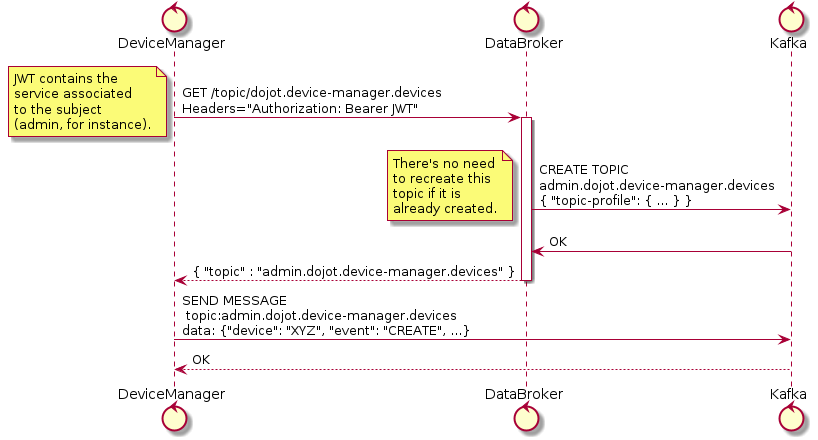
Fig. 5.4 Retrieving Kafka topics
In this example, DeviceManager needs to publish a message about a new device.
In order to do so, it sends a request to DataBroker, indicating which tenant
(within JWT token) and which subject (dojot.device-manager.devices) it
wants to use to send the message.
To better understand how it all works, you can check the Data Broker documentation for the component and API, the links are in Components and APIs.
5.2.3. Bootstrapping tenants
All components are interested in a set of subjects, which will be used to either send messages or receive messages from Kafka. As dojot groups Kafka topics and tenants into subjects (a subject will be composed by one or more Kafka topics, each one transmitting messages for a particular tenant), the component must bootstrap each tenant before sending or receiving messages. This is done in two phases: component boot time and component runtime.
In the first phase, a component asks Auth in order to retrieve all currently configured tenants. It is interested, let’s say, in consuming messages from device-data and dojot.device-manager.devices subjects. Therefore, it will request DataBroker a topic for each tenant for each subject. With that list of topics, it can create Producers and Consumers to send and receives messages through those topics. This is shown by Fig. 5.5.
![control Component
control Auth
control DataBroker
control Kafka
Component-> Auth: GET /tenants
Auth --> Component: {"tenants" : ["admin", "tenant1"]}
loop each $tenant in tenants
Component -> DataBroker: GET /topic/device-data \nHeaders="Authorization: JWT[tenant]"
DataBroker --> Component: {"topic" : "**$tenant**.device-data"}
Component -> Kafka: SUBSCRIBE\ntopic:**$tenant**.device-data
Kafka --> Component: OK
Component -> DataBroker: GET /topic/dojot.device-manager.devices \nHeaders="Authorization: JWT[tenant]"
DataBroker --> Component: {"topic" : "**$tenant**.device-data"}
Component -> Kafka: SUBSCRIBE\ntopic: **$tenant**.device-data
Kafka --> Component: OK
end](_images/plantuml-c5f8dbbfea56ca1a38a325f82faaa63317a240ac.png)
Fig. 5.5 Tenant bootstrapping at startup
The second phase starts after startup and its purpose is to process all
messages received through Kafka subscribing in dojot-management.dojot.tenancy.
This will include any tenant that is created
after all services are up and running. Fig. 5.6 shows how
to deal with these messages.
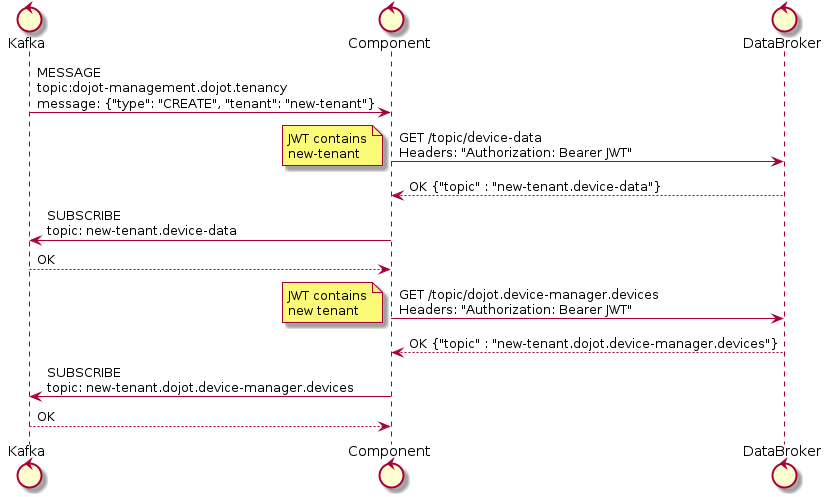
Fig. 5.6 Tenant bootstrapping
All services that are somehow interested in using subjects should execute this procedure in order to correctly receive all messages.
5.3. Auth + API gateway (Kong)
Auth is a service deeply connected to Kong. It is responsible for user management, authentication and authorization. As such, it is invoked by Kong whenever a request is received by one of its registered endpoints. This section will detail how this is performed and how they work together.
5.3.1. Kong configuration
There are two configuration procedures when starting Kong within dojot:
Migrating existing data
Registering API endpoints and plugins.
The first task is performed by simply invoking Kong with a special flag.
The second one is performed by executing a configuration script after starting Kong. Its only purpose is to register endpoints in Kong, such as:
#create a service
curl  -sS -X PUT \
--url ${kong}/services/data-broker \
--data "name=data-broker" \
--data "url=http://data-broker:80"

#create a route to service
curl  -sS -X PUT \
--url ${kong}/services/data-broker/routes/data-broker_route \
--data 'paths=["/device/(.*)/latest", "/subscription"]' \
--data "strip_path=false"
These commands will register the endpoint /device/*/latest and /subscription and all requests to it are going to be forwarded to http://data-broker:80. You can check the documentation on how to add endpoints in Kong’s documentation. The links are in the Components and APIs page.
For some of its registered endpoints, the script will add two plugins to selected endpoints:
JWT generation. The documentation for this plugin is available at Kong JWT plugin page.
Configures a plugin which will forward all policies requests to Auth in order to authenticate requests. This plugin is available inside the Kong repository.
The following request install these two plugins in data-broker API:
#pepkong - auth
curl  -sS  -X POST \
--url ${kong}/services/data-broker/plugins/ \
--data "name=pepkong" \
--data "config.pdpUrl=http://auth:5000/pdp"

#JWT generation
curl  -sS  -X POST \
--url ${kong}/services/data-broker/plugins/ \
--data "name=jwt"
5.3.1.1. Emitted messages
Auth will emit just one message via Kafka for tenant creation:
{
  "type" : "CREATE",
  "tenant" : "XYZ"
}
And one for tenant deletion:
{
  "type" : "DELETE",
  "tenant" : "XYZ"
}
By default these messages are created in
kafka topic dojot-management.dojot.tenancy.
This prefix topic can be configured, check the`Auth` component documentation Components and APIs.
5.4. Device Manager
DeviceManager stores and retrieves information models for devices and templates and a few static information about them as well. Whenever a device is created, removed or just edited, it will publish a message through Kafka. It depends only on DataBroker and Kafka for reasons already explained in this document.
The DeviceManager documentation on GitHub ReadMe explains in more depth all messages published. You can find the link in Components and APIs.
5.5. IoT agent
IoT agents receive messages from devices and translate them into a default
message to be published to other components. In order to do that, they might
want to know which devices are created in order to properly filter messages
which are not allowed into dojot (using, for instance, security information to
block messages from unauthorized devices). It will use the device-data
subject and bootstrap tenants as described in Bootstrapping tenants.
After requesting the topics for all tenants within device-data subject, IoT agent will start receiving data from devices. As there are a plethora of ways by which devices can do that, this step won’t be detailed in this section (this is highly dependent on how each IoT agent works). It must, though, send a message to Kafka to inform other components of all new data that the device just sent. This is shown in Fig. 5.7, in this case we are using the tenant admin.
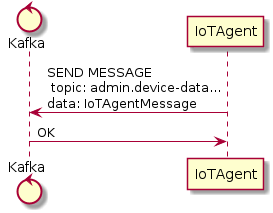
Fig. 5.7 IoT agent message to Kafka
The data sent by IoT agent has the structure shown in Fig. 5.8.
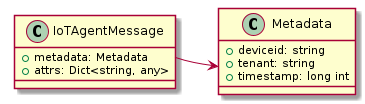
Fig. 5.8 IoT agent message structure
Such message would be:
{
    "metadata": {
        "deviceid": "c6ea4b",
        "tenant": "admin",
        "timestamp": 1528226137452
    },
    "attrs": {
        "humidity": 60,
        "temperature" : 23
    }
}
5.6. Persister
Persister is a very simple service which only purpose is to receive messages
from devices (using device-data subject) and store them into MongoDB. For
that, the bootstrapping procedure (detailed in Bootstrapping tenants) is
performed and, whenever a new message is received, it will create a new Mongo
document and store it into the device’s collection. The following image in
Fig. 5.9, shows an example of this flow using the.

Fig. 5.9 Persister
This service is simple as it is by design.
5.7. History
History is also a very simple service: whenever a user or application sends a request to it, it will query MongoDB and build a proper message to send back to the user/application. This is shown in Fig. 5.10.
![actor User
boundary Kong
control History
database MongoDB
User -> Kong: GET /device/history/efac?attr=temperature\nHeaders="Authorization: JWT"
activate Kong
Kong -> Kong: authorize
Kong -> History: GET /history/efac?attr=temperature\nHeaders="Authorization: JWT"
activate History
History -> MongoDB: db.efac.find({attr=temperature})
MongoDB --> History: doc1, doc2
History -> History: processDocs([doc1, doc2])
History --> Kong: OK\n{"efac":[\n\t{"temperature" : 10},\n\t{"temperature": 20}\n]}
deactivate History
Kong -> User: OK\n{"efac":[\n\t{"temperature" : 10},\n\t{"temperature": 20}\n]}
deactivate Kong](_images/plantuml-8af3411e89b68e533686b708b7fd9e0b753f60b9.png)
Fig. 5.10 History
5.8. Data Broker
DataBroker has a few more functionalities than only generating topics for
{tenant, subject} pairs. It will also serve socket.io connections to emit
messages in real time. In order to do so, it retrieves all topics for
device-data subject, just as in any other component interested in data
received from devices. As soon as it receives a message, it will then forward
it to a ‘room’ (using socket.io vocabulary) associated to the device and to the
associated tenant. Thus, all client connected to it (such as graphical user
interfaces) will receive a new message containing all the received data. For
more information about how to open a socket.io connection with DataBroker,
check DataBroker documentation in Components and APIs.
Note
The real time socket.io connections via Data Broker will be discontinued in future releases. Use Kafka WS instead.
5.9. Certificate authority
The dojot has an internal Certificate Authority (CA) capable of issuing x.509 certificates so that devices can communicate with the platform through a secure channel (using the TLS protocol). When requesting a certificate for the platform, it is necessary to inform a CSR, which will go through a series of validations until arriving at the internal Certificate Authority, which, in turn, if all checks pass successfully, will sign a certificate and link this certificate to the device registration. The x509-identity-mgmt component is responsible for providing certificate-related services for devices.
5.10. Kafka WS
The Kafka WS service allows users to retrieve conditional and/or partial real time data from a given dojot topic in a Kafka cluster. It works with pure websocket connections, so you can create websocket clients in any language you want as long as they support RFC 6455.
5.10.1. Connecting to the service
The connection is done in two steps: you must first obtain a single-use ticket through a HTTP request, then connect to the service via websocket passing it as a parameter.
5.10.1.1. First step: Get the single-use ticket
A ticket allows the user to subscribe to a dojot topic. To obtain it is necessary to have a JWT access token that is issued by the platform’s Authentication/Authorization service. The ticket must be retrieved via a HTTP request using the GET verb to the <base-url>/kafka-ws/v1/ticket endpoint. The request must contain the Authorization header with the previously retrieved JWT token as a value. Example:
The component responds with the following syntax:
{
  "ticket": "[an opaque ticket of 64 hexadecimal characters]"
}
Note: In the context of a dojot deployment the JWT Token is provided by the Auth service, and is validated by the API Gateway before redirecting the connection to the Kafka WS. So, no validations are done by the Kafka WS.
5.10.1.2. Second step: Establish a websocket connection
The connection is done via pure websockets using the URI <base-url>/kafka-ws/v1/topics/:topic. You must pass the previously generated ticket as a parameter of this URI. It is also possible to pass conditional and filter options as parameters of the URI.
5.10.2. Behavior when requesting a ticket and a websocket connection
Below we can understand the behavior of the Kafka WS service when a user (through an user agent) requests a ticket in order to establish a communication via websocket with Kafka WS.
Note that when the user requests a new ticket, Kafka WS extracts some information from the user’s access token (JWT) and generates a signed payload, to be used later in the decision to authorize (or not) the websocket connection. From the payload a ticket is generated and both are stored in Redis, where the ticket is the key to obtain the payload. A TTL is defined by Kafka WS, so the user has to use the ticket within the established time, otherwise, Redis automatically deletes the ticket and payload.
After obtaining the ticket, the user makes an HTTP request to Kafka WS requesting an upgrade to communicate via websocket. As the specification of this HTTP request limits the use of additional headers, it is necessary to send the ticket through the URL, so that it can be validated by Kafka WS before authorizing the upgrade.
Since the ticket is valid, that is, it corresponds to an entry on Redis, Kafka WS retrieves the payload related to the ticket, verifies the integrity of the payload and deletes that entry on Redis so that the ticket cannot be used again.
With the payload it is possible to make the decision to authorize the upgrade to websocket or not. If authorization is granted, Kafka WS opens a subscription channel based on a specific topic in Kafka. From there, the upgrade to websocket is established and the user starts to receive data as they are being published in Kafka.
![actor User
boundary Kong
control "Kafka-WS"
database Redis
control Kafka
group Get Ticket
User -> Kong: GET /kafka-ws/v1/ticket\nHeaders="Authorization: JWT"
Kong -> Kong: Checks JWT
Kong -> "Kafka-WS" : Request a ticket
"Kafka-WS" -> "Kafka-WS" : Sign the payload and\ngenerate a ticket for it
"Kafka-WS" -> Redis : Register the ticket and\npayload with a TTL
"Kafka-WS"<-- Redis : Sucess
User <-- "Kafka-WS" : Returns the newly generated ticket
end
group Connect via websocket
User -> Kong: Upgrade HTTP to websocket\n(ticket in the URL)
Kong -> "Kafka-WS" : Forward the ticket
"Kafka-WS" -> Redis : Recovers payload (if any)
"Kafka-WS"<-- Redis : Payload found
"Kafka-WS" -> "Kafka-WS" : Checks the payload
"Kafka-WS" -> Kafka : Subscrive to kafka topic\n(Using the payload)
"Kafka-WS" <-- Kafka : Sucess
User <-- "Kafka-WS" : Upgrade to websocket accepted\nConnected!
"Kafka-WS" <-- Kafka : New data in the topic
User <-- "Kafka-WS" : Returns data
"Kafka-WS" <-- Kafka : [...]
User <-- "Kafka-WS" : [...]
"Kafka-WS" <-- Kafka : [...]
User <-- "Kafka-WS" : [...]
end](_images/plantuml-283bf1dd168fe43adb35cc27fd0778134dfd4bd3.png)
Fig. 5.11 Obtaining a ticket and connecting via websocket